ShopDreamUp AI ArtDreamUp
Deviation Actions
So, ever fancied trying out you skills on the horror and macabre side of things? I started out horror and macabre photography with a crumby camera and mostly improvised props. I'm a skint student, after all.
After receiving many questions about my horror and macabre blood effects, I put together a FAQ (Frequently Asked Questions) journal to help people out and also let people know how a lot of my work is done- whether it is for curiosity, or if people want to have a go themselves. This news article is meant to be a reference to the methods used in my work and the work of others, as well as useful tips and a glossary for some of the items used.
Kit List
My horror work uses an extensive kit list of props and ingredients. Not all of it is used at the same time, but some people may not be familiar with them all. Here is a basic glossary of some things I have used (with examples), so you can find them yourself.
 Magic Tape- This is like any other sticky tape, but is advertised as being 'Invisible'. It is handy when sticking things that you might not want your camera to see. It is strong and clear and can be found in a good stationery shop. Take a look at this Example.
Glycerin/Glycerine- This is a fairly viscous liquid used for sore throats and related ailments, so you'll find it in a pharmacy or a good supermarket. It is usually clear and is non-toxic. Here is an Example.
PVA glue- This is the white glue you often get in schools. It dries clear and can be peeled off fingers and such. It is usually supplied it in large quantities, in large squeezy bottles. PVA stands for Poly vinyl acetate and is used with kids in mind, although it is NOT meant to be edible. Here is an Example.
Dental Wax- This is quite hard stuff to get hold of, but if you've ever had any orthodontic work or a brace, you may have had some. It is a pliable plastic wax that you can mould easily with your fingers- much unlike candle wax which you need to heat up first. Non-flavoured is the best to use. Here is an Example.
Food colouring- Regular edible colouring for use in cakes and foodstuffs. Usually found in liquid form and can be easily obtained in a decent supermarket near the cake-baking stuff. More than one colour is recommended. Here is the stuff that I use.
Golden Syrup- This is similar to honey and is a (very tasty) edible and viscous fake-blood ingredient. It can be found in good supermarkets along with jams. Here is the original Golden Syrup.
Blu-tack- This is a (blue) adhesive plastic that is often used to stick posters up. It is a handy tool for generally sticking things together, but isn't the best thing to use on skin, as it won't stick so well. Here is an example of it, but you can also get white tack and other coloured versions.
Fake Blood
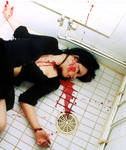
Fake blood is an integral part of most horror and macabre photo shoots. There are many different kinds of fake blood, and most of them are cheap and easy to make yourself. You don't need to spend much at all if you're making it all from scratch.
 Shop-bought- Shop bought fake blood varies a lot. It is usually found in small quantities at Halloween. Cheap Halloween blood is usually quite viscous and gloopy. The colour is sometimes a little unnatural too, which isn't ideal. You can try watering down fake blood you have bought, or adding more natural colours to it.
Examples of shop-bought fake blood:

Professional Fake blood- Quite expensive, but often worth it. There are many suppliers of professional make up, such as Kryolan. Companies have different types of blood for different situations (such as darker and lighter blood for arterial or veinous blood). Professional blood has a good consistency and colour, but can get very expensive when purchasing large amounts.
Examples of professional fake blood:

PVA Glue-based fake blood- This stuff is a good recipe to use when making your own fake blood. The PVA glue mentioned previously is a great base for viscous fake blood. It is white to begin with, so add a large amount of red food colouring, and then small amounts of both blue and green food colouring and mix it well. Test it out on your skin first to check you're not allergic to it and that it is a suitable colour. This blood is not ideal for use around the mouth and should NOT be swallowed
Examples of PVA glue-based fake blood:


Glycerin-based fake blood- This is viscous compared to the PVA glue-based blood. It is advisable to check how the glycerin flows on whatever you'll be using it on BEFORE you add any colour. It acts differently and prefers to run off things, rather than stick. As before, when adding food colouring, add lots of red and smaller amounts of blue and green colouring. This fake blood is edible, provided you have added nothing else to it
Examples of Glycerin-based fake blood:
 :thumb36525306:

Golden Syrup-based fake blood- A viscous and edible example for a fake blood base. Again, add food colouring in good proportions and mix well. The syrup and food colourings take a while to mix in. This is sticky and ideal for use near your mouth, although it can get a little sickly after a while!
Examples of Golden Syrup-based fake blood:


Sauces as fake blood- Edible sauces can make surprisingly good fake blood without much being done to them. Sauces such as chocolate sauce (for ice cream), tomato sauce and strawberry sauce can look realistic. Check how realistic these sauces look as blood before you use them extensively in photography. You may need to add a little food colouring or water to them to get a good consistency or colour first. Cheap and easy!
Example of Chocolate sauce as fake blood:
:thumb19475397:
Shampoo and other household liquids as fake blood- Liquids around the house can be used as fake blood too. Washing up liquid can be a great base for fake blood as long as you use a light colour to start with (such as yellow, NOT green!). Also, shampoo is a tried and tested fake blood type too, whether you add colours to it, or buy red coloured shampoo, they can make great blood.
Example of shampoo-based fake blood:
:thumb49254190:
Real Blood- I shall take this opportunity to remind people that real human blood is NOT allowed on deviantART. Using animal blood is permitted, but you MUST have a mature content tag on an image using it. I have not used any real blood myself, but it obviously has the advantage of looking realistic from the start. You should be able to obtain animal blood from a butcher for little money, but its not in great demand.
Experimentation is a great way of improving any home-made fake blood. So add things you think will help the colour or consistency to make it a better fake blood.
General Tips
There are a lot of things to think about when doing horror photography, and photography in general. Here are a few tips and tricks to remember.
Texture- Adding texture to fake blood and wounds will make your work a lot more realistic. This can be done easily using stuff like tissue, toilet paper or cotton wool. With any of these, you really want to saturate it with fake blood, so it looks less like tissue and more like flesh. It will make your blood appear lumpy and also darker.
Lighting- Any photo should have adequate lighting. If your room is poorly lit, you may get out-of-focus or grainy shots. To remedy this, try and put on as many lights as you can, and also any desk lamps that can be pointed at your model
Testing- Before you start shooting any photos, make sure you have everything you need for it. Test out your lighting conditions before you start applying fake blood to your model. If you don't have enough lighting or are missing things for your shoot, it will be very difficult going to find them and set them up when you or your model is covered in fake blood. It can be cold and uncomfortable and can sometimes dry very quickly. Make sure the special FX are the LAST things you do before shooting.
Re-apply- Photo shoots can take a long time, so this means you often need to re-apply FX make up and fake blood to your model due to it drying out or running off! This can make your FX more realistic, as you have more layers with texture and thick blood. Keep checking your make up is up to scratch throughout your photo shoot, as there is nothing as annoying as checking the tens or hundreds of photos you took to find half of the shots have hardly any fake blood in.
Take as many shots as possible- More pictures means more to choose from when you have cleaned all of your blood and props away. You can experiment with different angles and exposure. And just in case a few of your pictures are too small or too blurry, you still have lots of better ones to choose from.
Clothing- Using your best clothing is not ideal for a horror photo shoot. Fake blood can stain very easily, so make sure you aren't using something you cannot afford to get dirty. Buy cheap clothing that you will only use for horror photo shoots, or dark clothing that you won't see the staining on. Fake blood can stain skin as well, so make sure you have the means to wash it off (warm soapy water or make up remover).
Illusion
Illusion is a great tool with horror and macabre photography. This means making things look much worse than they are!
Here are some examples of my own work that have had many questions asked about the methods used.
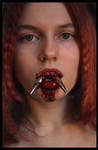
How do you make the pins in Fixxxer look like they're sticking in you?
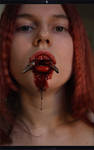
I got some pins, and some wire cutters and cut the pins into unequal halves. You can see the top half of the pins here. They were then mounted into dental wax stuck to my hand. Small pieces of tissue were stuck over the wax and glycerin-based fake blood was added around them.
How did you make it look like you cut into your leg in Pretty Piece Of Flesh?

I used a square of dental wax here. I added a smaller square of tissue underneath it and moulded it onto my leg. I then cut a square of the wax out, just smaller than the tissue (this is the flap you can see being held up). I then added PVA glue-based fake blood to get the result you see.
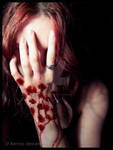
How did you put a rose through your hand in Until It Sleeps?

This was a very tricky, but amazingly rewarding photo to take. I bought a rose especially for this shoot. It had a long stem that I cut a piece out of, giving me the head with some of the stem, and the rest of the leafy stem separate. The leafy stem was stuck to the bottom of my hand with blu-tack, a drawing pin and magic tape. The head was a lot harder to attach, due to the weight of it. I used another drawing pin set in blu-tack in the palm of my hand, stabbing the drawing pin into the base of the cut stem. The blu-tack was moulded into my palm to make the skin look raised. The head of the rose was left to rest on my fingers, due to a lack of stability otherwise. The blood was added in the palm of my hand over the moulded blu-tack to give the final image.
How did you put a razor blade through your fingers in Razor Blade Torture?

Razor blades are very easy to work with (provided you are careful with them). The make illusions easy, as they are thin and easy to cut through. These razor blades were cut into with scissors to leave a gap with width of my finger. They can be very jagged when cut, so using sticky tape over the blade will stop you getting cut. This is essential if you are using the blades in areas you'd rather not cut up/off.
Other Ideas
Illusions can be done easily by having a clear idea of what you want to do. If you want something to look like it is through a part of your body, try to cut it in half. I have a hacksaw and a mini vice that I use to cut things in half. If you have something that is too hard to cut in half, or something that simply can't be cut, try and improvise. Try making it out of cardboard or plastic and painting it accordingly. There is always a way around it!
Tutorials
There are a few tutorials on DeviantART dedicated to fake blood or the application of it. They provide great step-by-step instructions on how to achieve it.

 :thumb63253598:
Photomanipulation
If you don't have a camera and are desperate to do some horror and macabre work, check out some of the fantastic stock that DeviantART has to offer.
Remember- These images are for you to manipulate, not to change the colours ever-so slightly, copy or submit as your own. Be creative!


 :thumb20869652:
Some clubs that accept horror photography
There are plenty of clubs on deviantART that accept horror and macabre photography. Check these for the work of MANY deviants (not just one!) and also for some great dark inspiration.


With special thanks to:
EveryNextDream and hellmet for the use of some of their images in this article.
After receiving many questions about my horror and macabre blood effects, I put together a FAQ (Frequently Asked Questions) journal to help people out and also let people know how a lot of my work is done- whether it is for curiosity, or if people want to have a go themselves. This news article is meant to be a reference to the methods used in my work and the work of others, as well as useful tips and a glossary for some of the items used.
Kit List
My horror work uses an extensive kit list of props and ingredients. Not all of it is used at the same time, but some people may not be familiar with them all. Here is a basic glossary of some things I have used (with examples), so you can find them yourself.
Fake Blood
Fake blood is an integral part of most horror and macabre photo shoots. There are many different kinds of fake blood, and most of them are cheap and easy to make yourself. You don't need to spend much at all if you're making it all from scratch.
Examples of shop-bought fake blood:
Examples of professional fake blood:
Mature Content
Examples of PVA glue-based fake blood:
Mature Content
Mature Content
Mature Content
Examples of Glycerin-based fake blood:
:thumb36525306:
Examples of Golden Syrup-based fake blood:
Mature Content
Mature Content
Example of Chocolate sauce as fake blood:
:thumb19475397:
Example of shampoo-based fake blood:
:thumb49254190:
Experimentation is a great way of improving any home-made fake blood. So add things you think will help the colour or consistency to make it a better fake blood.
General Tips
There are a lot of things to think about when doing horror photography, and photography in general. Here are a few tips and tricks to remember.
Illusion
Illusion is a great tool with horror and macabre photography. This means making things look much worse than they are!
Here are some examples of my own work that have had many questions asked about the methods used.
Mature Content
I got some pins, and some wire cutters and cut the pins into unequal halves. You can see the top half of the pins here. They were then mounted into dental wax stuck to my hand. Small pieces of tissue were stuck over the wax and glycerin-based fake blood was added around them.
Mature Content
I used a square of dental wax here. I added a smaller square of tissue underneath it and moulded it onto my leg. I then cut a square of the wax out, just smaller than the tissue (this is the flap you can see being held up). I then added PVA glue-based fake blood to get the result you see.
Mature Content
This was a very tricky, but amazingly rewarding photo to take. I bought a rose especially for this shoot. It had a long stem that I cut a piece out of, giving me the head with some of the stem, and the rest of the leafy stem separate. The leafy stem was stuck to the bottom of my hand with blu-tack, a drawing pin and magic tape. The head was a lot harder to attach, due to the weight of it. I used another drawing pin set in blu-tack in the palm of my hand, stabbing the drawing pin into the base of the cut stem. The blu-tack was moulded into my palm to make the skin look raised. The head of the rose was left to rest on my fingers, due to a lack of stability otherwise. The blood was added in the palm of my hand over the moulded blu-tack to give the final image.
Mature Content
Razor blades are very easy to work with (provided you are careful with them). The make illusions easy, as they are thin and easy to cut through. These razor blades were cut into with scissors to leave a gap with width of my finger. They can be very jagged when cut, so using sticky tape over the blade will stop you getting cut. This is essential if you are using the blades in areas you'd rather not cut up/off.
Other Ideas
Illusions can be done easily by having a clear idea of what you want to do. If you want something to look like it is through a part of your body, try to cut it in half. I have a hacksaw and a mini vice that I use to cut things in half. If you have something that is too hard to cut in half, or something that simply can't be cut, try and improvise. Try making it out of cardboard or plastic and painting it accordingly. There is always a way around it!
Tutorials
There are a few tutorials on DeviantART dedicated to fake blood or the application of it. They provide great step-by-step instructions on how to achieve it.
:thumb63253598:Photomanipulation
If you don't have a camera and are desperate to do some horror and macabre work, check out some of the fantastic stock that DeviantART has to offer.
Remember- These images are for you to manipulate, not to change the colours ever-so slightly, copy or submit as your own. Be creative!
Mature Content
Mature Content
Mature Content
:thumb20869652:Some clubs that accept horror photography
There are plenty of clubs on deviantART that accept horror and macabre photography. Check these for the work of MANY deviants (not just one!) and also for some great dark inspiration.
With special thanks to:
EveryNextDream and hellmet for the use of some of their images in this article.
Much too long..
Hello folks!
Yes, it's been far, far too long since I was around in these neck of the woods for more than a fleeting moment!
I've been busying myself with two jobs and a homelife, meaning I have little time to squeeze in those 5-hour long commenting sessions. Unfortunately, I'm a few thousand messages behind, as deviantART is adamant that my commenting is spam! Alas, it means I get to say a lot less on here than I wish to, but c'est la vie.
Anyway, since my last journal entry back in August 2011, my life has rather changed slightly. I now own a house, and not only have I got my full time job as before, I'm also juggling it with my small je
Time flies
Holy jaysus
Where does time go? I swear it was Christmas about 10 minutes ago- now it is May?! Whut?!
Everything seems to be running smoothly these days. Had a nice time these past couple of weekends with free time off work. I've also had a nice training session on how to describe rocks under a scanning electron microscope. Win.
FAYSE
Well, I gave in to the Face your avatar courtesy of MyLastBlkRose (https://www.deviantart.com/mylastblkrose) who decided to ask me where my face was! Well, here it is in all it's black and white glory!
`TerraRhapsody (https://www.deviantart.com/terrarhapsody)
This photo contains me, a crisp and one of my many hats. Photo taken by my darling AphexPhoton (https://www.deviantart.com/aphexphoton) at work :)
FAYSEBOOK
I've re
Forum Features #16 - April: Flowers
Here we are again! The MN@ team is here to feature the works of dA's beloved forumers!
Once per month we'll select one active user in the forums and we'll feature his or her gallery. This is someone we believe represents the forums well with both good forum-abilities and art!
As we're awesome, we also decided to give an opportunity to everybody to get featured! Every month, we'll create a thread in the Deviation Thumbshare Forum with a different theme! This thread will be made into a sticky for easy access. All you have to do is post thumbs from your gallery matching the theme! At the end of the month, we'll select our favorite thumbs from
Shortest Journal evar
And by short I mean..
Not that short :B
A lot has gone on since my last journal back in November. Alas, it has been much too long, but my life has rather been cast into turmoil these couple of months, and unfortunately, I have had no real internet connection of which to speak while I've been tidying my life up.
WTF happened?
In short:
:bulletblue: My grandfather died
:bulletblue: I split up with my boyfriend
:bulletblue: Got together with my best friend, AphexPhoton (https://www.deviantart.com/aphexphoton)
:bulletblue: Moved out of my house unofficially and into my bosses house
:bulletblue: Moved out officially
:bulletblue: Taking steps to move in with :devaphexphoton
© 2008 - 2024 TerraRhapsody
Comments62
Join the community to add your comment. Already a deviant? Log In
I stumbled upon this thanks to a google search and I absolutely love these tips. Thanks for the blog post!